
“…What do you usually do to record the commentary tracks while playing?”
Good question.
First of all I have one of these babies. It has an internal mic solution. However, not everyone has one of those, and I can understand that. In fact, I’ll be a good percent of you are on some form of Windows machine, and would like instructions as well. We’ll split this up into two sections, a Mac section and a Windows section.
For both types of computers, you will need the following:
- A fast enough computer to both play your emulator/rom and the video recording software.
- A little bit of cash. If you’re spending over 20bux on something for the internet there’s problems. You can pick up a cheap headset at Walmart and it should work well.
- Patience.
- Google Video/Dailymotion/YouTube account.
- TIME.
Mac
Step 1 – Vocal Verification!
Make sure your Apple either has an internal microphone, or some way of getting audio. Perhaps a USB Line In. Whatever the case may be, just get your Mac to hear your voice. (Hello, computer.)
Got that? If not I can wait.
Alright, once your equipment is hooked up, let’s verify that your Mac can hear you. Open up System Preferences.

Then, let’s click this guy.

Click on input next.

Talk to your Mac. Tell it it is beautiful. These bars should move as you speak. If they do, AWESOME! That means your Mac can hear you. If they don’t. Well, I don’t know. Troubleshoot.
If your Mac can hear you, then let’s go on to Step 2. If not, continue to troubleshoot.
Step 2 – Let’s get Viewtiful, Baby
Henshin a go-go, baby!
For this section, we’re actually going to get some recording going. First of all, we need a video recording program. For this, I WHOLEHEARTEDLY recommend shinywhitebox’s iShowU. The name may be completely stupid, but the software works SO WELL. I haven’t had a single problem with it. It does cost 20bux, but for what it does, and the simplicity of it, it’s MORE than worth it.
I know, earlier I said if you spend over 20bux for the internet there’s problems. But it’s for THE INTERNET, dammit. INTERNET!
Now, let’s launch the program. You should then get a screen like this:
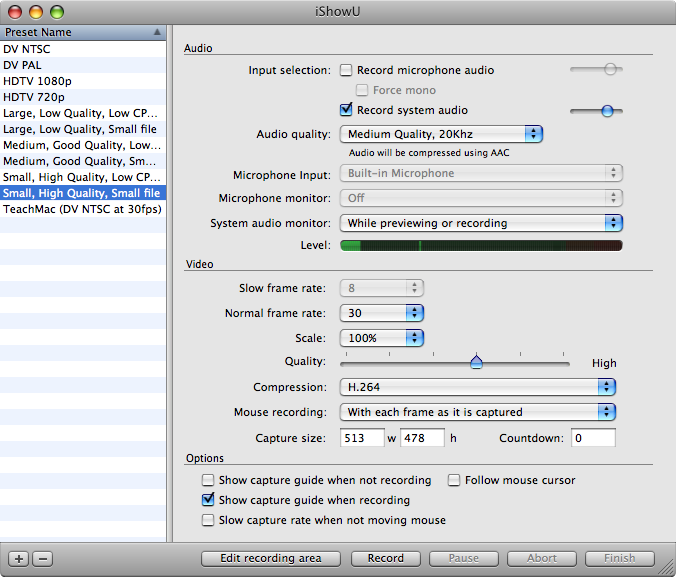
Click for Big.
Now, if it isn’t checked, tell it to both “Record Microphone Audio” and “Record System Audio”. If it prompts you to install something called “Soundflower” install it, because Soundflower allows you to record system audio. And system audio is pretty essential to recording video game sounds, right?
Now, let’s pick a video format. I suggest using “Small, High Quality, Small File” and then leave it alone. Now open your emulator+rom combo. Once the game and emulator is loaded, switch back to iShowU and mash the big ‘Edit Recording Area’ button. From there, resize the area to fit just the emulator window, minus the title bar.

Click for Big.
When you’re ready to record, mash down the following keyboard combo: Fruit+Shift+A (Apple-Shift-A)(Command-Shift-A)
Play the game, and commentate however you wish.
When you’re done recording mash the following combo: Fruit+Shift+T (Apple-Shift-T)(Command-Shift-T)
Move on to step 3.
Step 3- Sharing is Caring!
Now, we’ve got our movie recorded. I’m going to assume your Mac has iLife on it, and therefore, iMovie. If it doesn’t, get iLife now–it’s so useful for things other than LPs. Open iMovie and import the movie you just made. For this example, I’m going to use iMovie ’08.
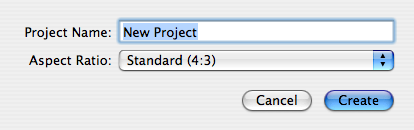
Open iMovie and create a new project. Select the Standard option give it a name and hit Create.
Now hit the Share menu and hit Export Movie. Give it a name and select the Mobile Option. Click Export and let iMovie do its thing.
(If you’re using an older version of iMovie, fiddle around with “Export as QuickTime Movie” and its settings. You’ll find a setting you like.)
Once the movie has been created, upload it to the internet.
DONE!
Windows
Please note, I have not actually done this. So take these instructions with a salt lick.
Step 1 – Can you hear me now? Good.
Just like the Mac, we want your Windows machine to hear you. Most Windows computers have a Line In/Microphone port. All you need is either a Microphone or a headset with a Mic. Hook your equipment up, and have Windows verify that it can hear you. I believe this is done in SoundRecorder? That, or the Sound control panel.
Once Windows can hear you, make sure you can record it, too. Again, use SoundRecorder to verify this. If you are good, go on to the next step. If not, troubleshoot.
Step 2 – Do you see what I see?
You have a few options here. You can either use Windows Media Encoder, which can compress your movies, and record them in real time. Realtime recording is only recommended if you have a decent machine, something with a dual core should be able to handle it well.
If you don’t want to use Windows Media Encoder, then you can use CamStudio, which is the free alternative to the $300 Camtasia screen recording program.
Whichever one you use, edit your recording area to that of your emulator screen, to just capture the game.
Record your game play and commentary. And then prepare for the next step.
Step 3 – Giving back.
In this step you’re going to compress your video to get it down to something that’s not several hundreds of MB (or even a few GB). First, you will need a program called MediaCoder.
The following instructions are based off of Build 3678, and may be slightly out of date.
- Launch the program and make it less annoying. I’ll let you decide on how to make it less annoying.
- Find the ‘Picture’ tab in that stuff on the left. By default, the frame rate is changed to 25. Just uncheck the box.
- Drag-and-drop and files you want to convert into the list at the top. You can see your audio settings on the right. The defaults are all fine. If you want to do something to the compressed file in VirtualDub for some reason, change VBR to CBR. Otherwise, you can leave it alone.
- Now, click the Video tab on the left. Change Mode to Two-Pass. Beneath that is the bitrate slider. Move that to 500 or so. I like to punch in a value of 512 to the right. Format should still be Xvid, and Container should be AVI.
- Now you just need to go to the Picture tab. If your video isn’t already at 320×240, change that here using the resize option. Uncheck the frame rate thing if it is checked off.
- Now click the Start button up on the toolbar. The progress bar will fill up pretty quick, then start over more slowly. Eventually you’ll get your new, compressed file. By default, the new file will show up in the same directory as the original file with “_transcoded” added to the file name.
The program will remember your settings, too.
Instructions found at: The Tech Support Fort (SomethingAwful.com Forums Link, may or may not be viewable.)
Upload and share!
DONE!
I usually do not comment, but after reading a few of the remarks here How-to: Create a
Video “Let’s Play!”. | Oapboap.org. I actually do have a few questions for you
if you do not mind. Is it only me or do a few of the responses appear
as if they are written by brain dead visitors? :-P And, if you are writing on additional
sites, I would like to follow you. Could you make a list of the complete urls of your social networking
sites like your twitter feed, Facebook page or linkedin profile?
Here is my blog post: roofing mississauga
Approved this spam comment, because it made me :lol:.